It’s easy to print with the Canon Pixma mg2522 printer, but if you’re unsure how to scan on Canon Pixma mg2522 to your computer, this article can help.
Canon Pixma mg2522 comes with a sheetfed scanner that lets you scan office, school, or other documents to your computer.
In this guide, I’ll explain how to scan documents from Pixma mg2522 printer to your Windows and Mac computers!
How To Scan On Canon Pixma mg2522
- In windows, Click the start button > Settings > Devices > Printers & Scanners.
- Select Canon mg2500 Series > Manage > Select Scanner: Canon MG2500 Series > Open Scanner > Select File Type and Click Scan.
- On a Mac, Click Apple Icon > System Preferences > Printers & Scanners. If the printer is not listed, click + and select Canon Pixma mg2522 printer > Scan > Open Scanner > Scan. If prompted for permission, click OK.
There are two ways you can use to scan your documents with Canon Pixma mg2522:
- Windows/Mac Default Scanner
- IJ Scan Utility Tool
Table of Contents
Steps to Scan on Canon Pixma mg2522 To Windows
Here are the steps to scan with Canon Pixma mg2522 printer to windows
- Turn on your printer and connect it to your computer or laptop using a USB cable. Afterward, install the required drivers from your printer’s CD or the Canon website.
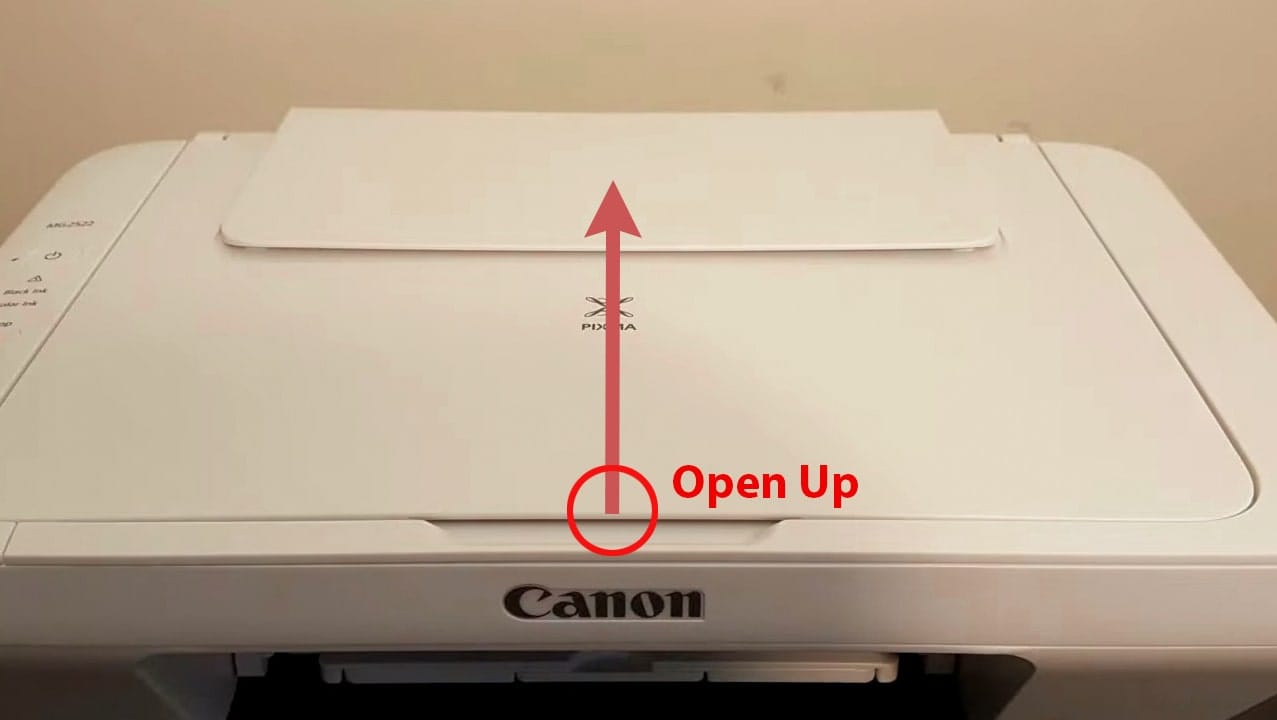
- To scan a page, open the top scanner lid of your printer and place a page on the scanner glass facing downwards (only the downward side of the page will be scanned). Then close the scanner lid.
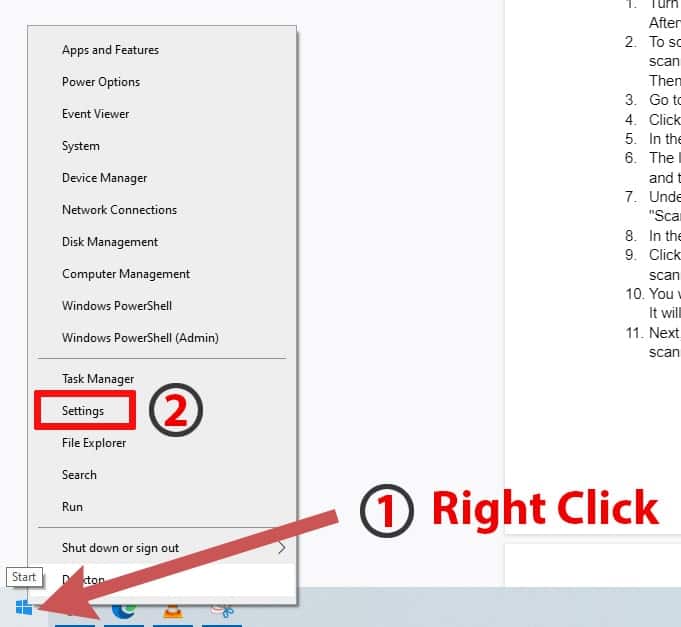
- Go to your computer, right-click the start menu, and click the “settings” icon.
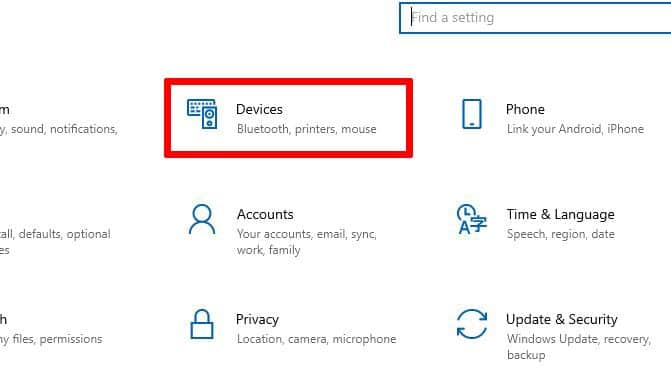
- Click Devices.
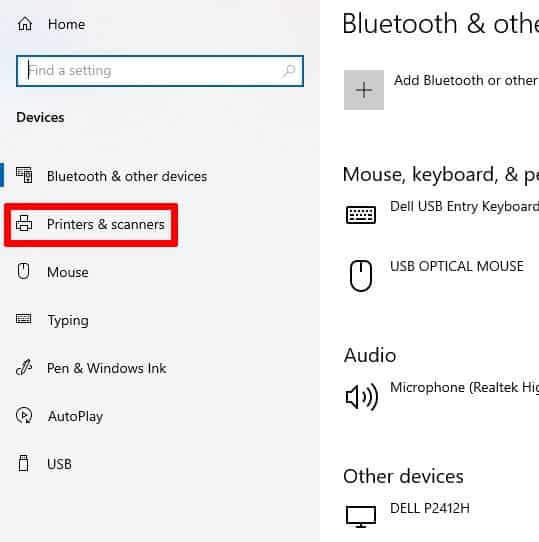
- In the device section, click on Printers & Scanners on the left side of the window. You can also open the Printer & Scanner by searching the term in your windows start menu.
- The list of installed printers will appear here, so click on Canon mg2500 Series Printer and then click Manage.
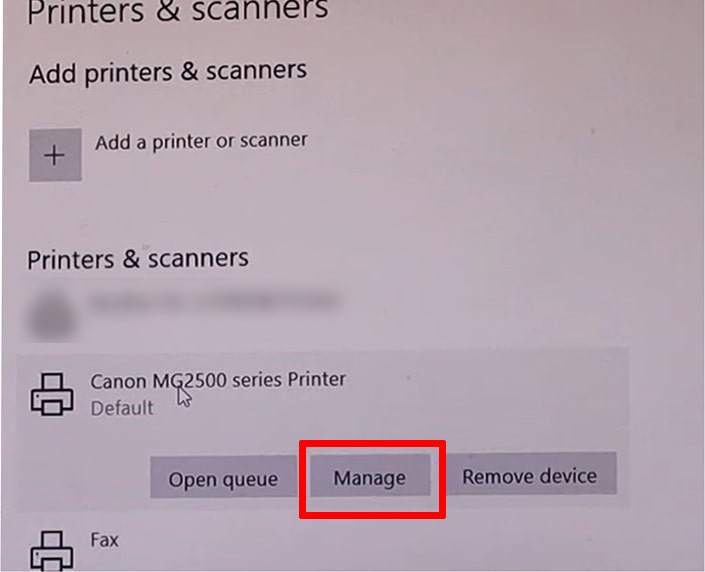
- Under Manage your device, Click on Canon: MG2500 Series printer and choose “Scanner: Canon MG2500 Series” from the drop-down list. Then click Open Scanner.

- In the new window, select the file type as PDF or whatever you prefer.

- Click on the Scan Icon at the bottom. It will send a request signal to your printer to start scanning the document.

- You will see a loading icon with scanning on the screen as your printer scans your page. It will change to processing in a few seconds, and the scanning will be completed.

- Next, click on the View button in the upper right corner of the window. This will open your scanned document in your PDF viewer or Web browser.

How To Scan with Canon Pixma mg2522 using the IJ utility Scanner Tool
The IJ Utility Tool and some other Canon Apps are automatically installed When installing the MP drivers of the Canon Pixma mg2522 printer. This simple yet powerful tool allows you to scan any documents from your Canon Pixma mg2522 to your computer.
Here are the steps to scan documents with Canon Pixma mg2522 using the canon IJ Utility Tool:
- Ensure that your printer drivers have been installed correctly. Then connect your printer to your computer using a USB cable.
- Open the top scanner lid of the printer and place the page on the scanner glass while ensuring the page you want to scan is facing downward. Then close the scanner lid.
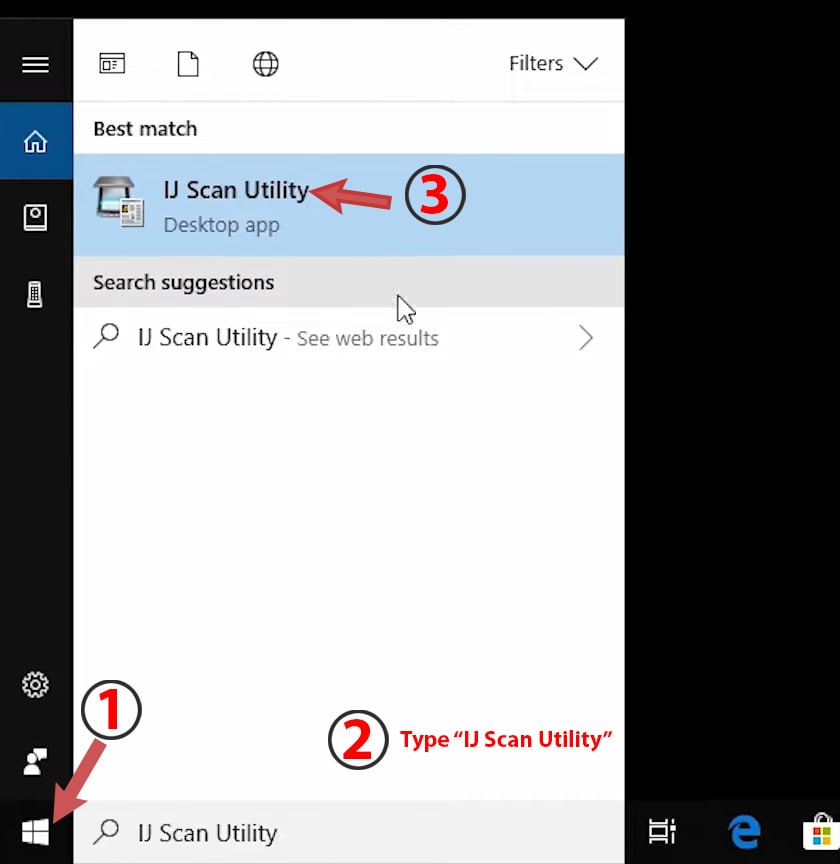
- Open the IJ Scan Utility Tool by pressing the Windows button on your keyboard or left-clicking on the start menu button, typing “IJ Scan Utility Tool” without double quotes, and pressing enter. Alternatively, you can find the app by expanding Canon Utilities in the start menu.
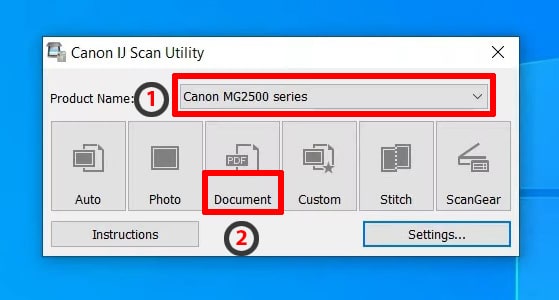
- Choose the Canon Mg2500 Series under Product Name. If it hasn’t been selected, then click on the document. This will begin scanning your placed document.
- As soon as you click on Document, the scanning process will begin, with a message saying, “Scanner is warming up…”
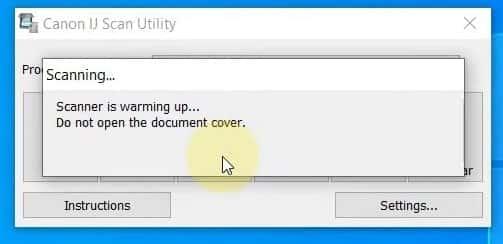
- The following message will say, “Scanning, do not open the document cover.” This will take a few seconds to complete.
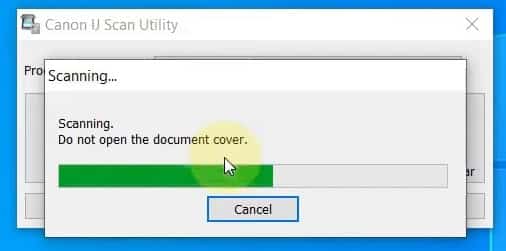
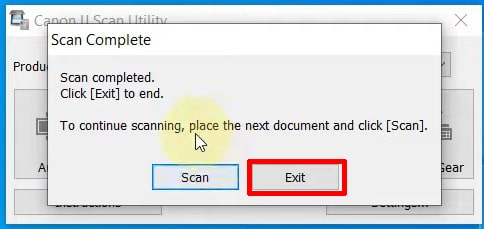
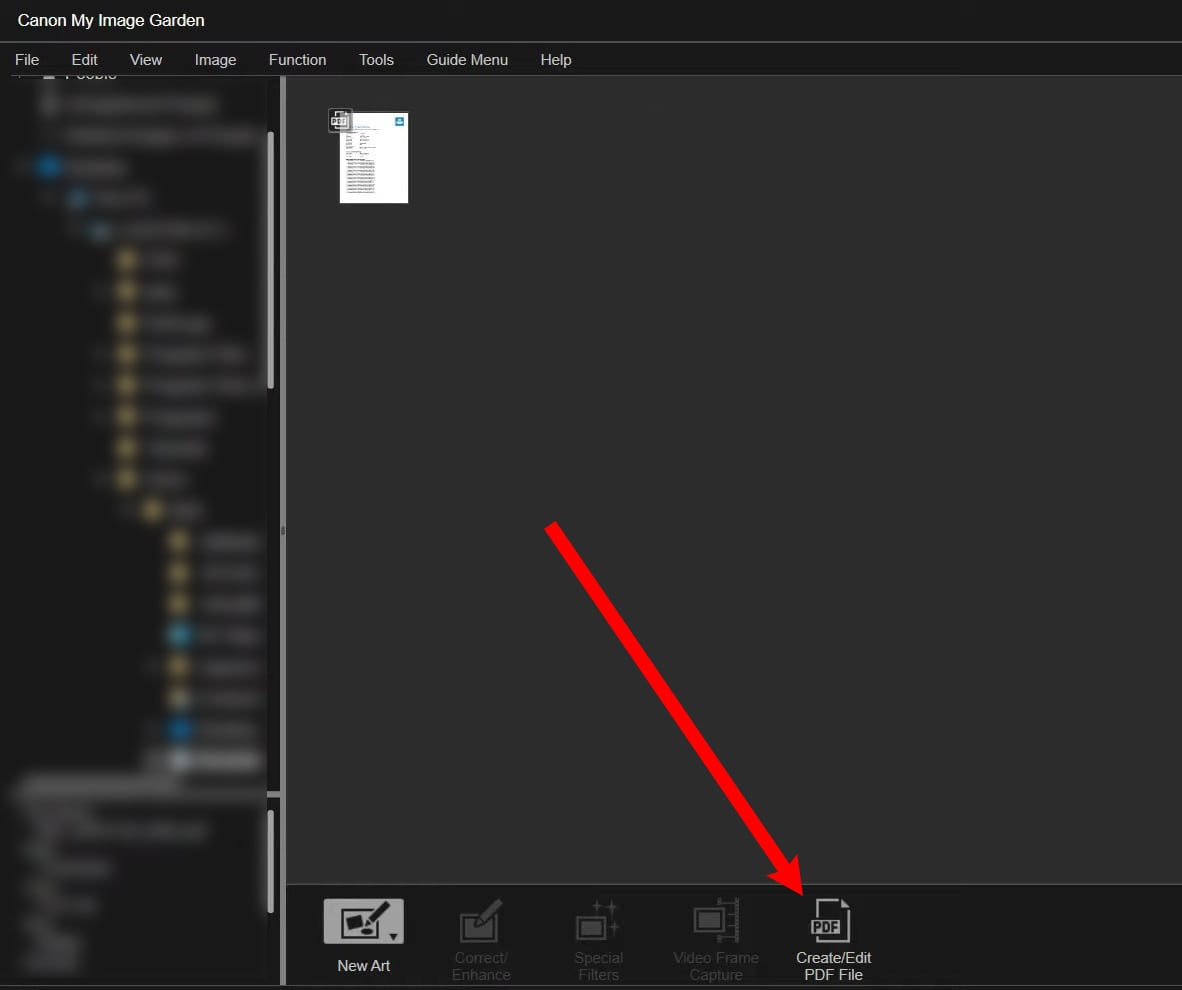
- Once your document is scanned, the IJ utility tool will ask you whether you want to scan another document or exit, so if you want to scan another document, click on scan; else, click Exit. Clicking on Exit will automatically open Canon printers’ My Image Garden tool. Here you can Print and edit your scanned document.
- If you want to save your document, click Create/Edit PDF file.
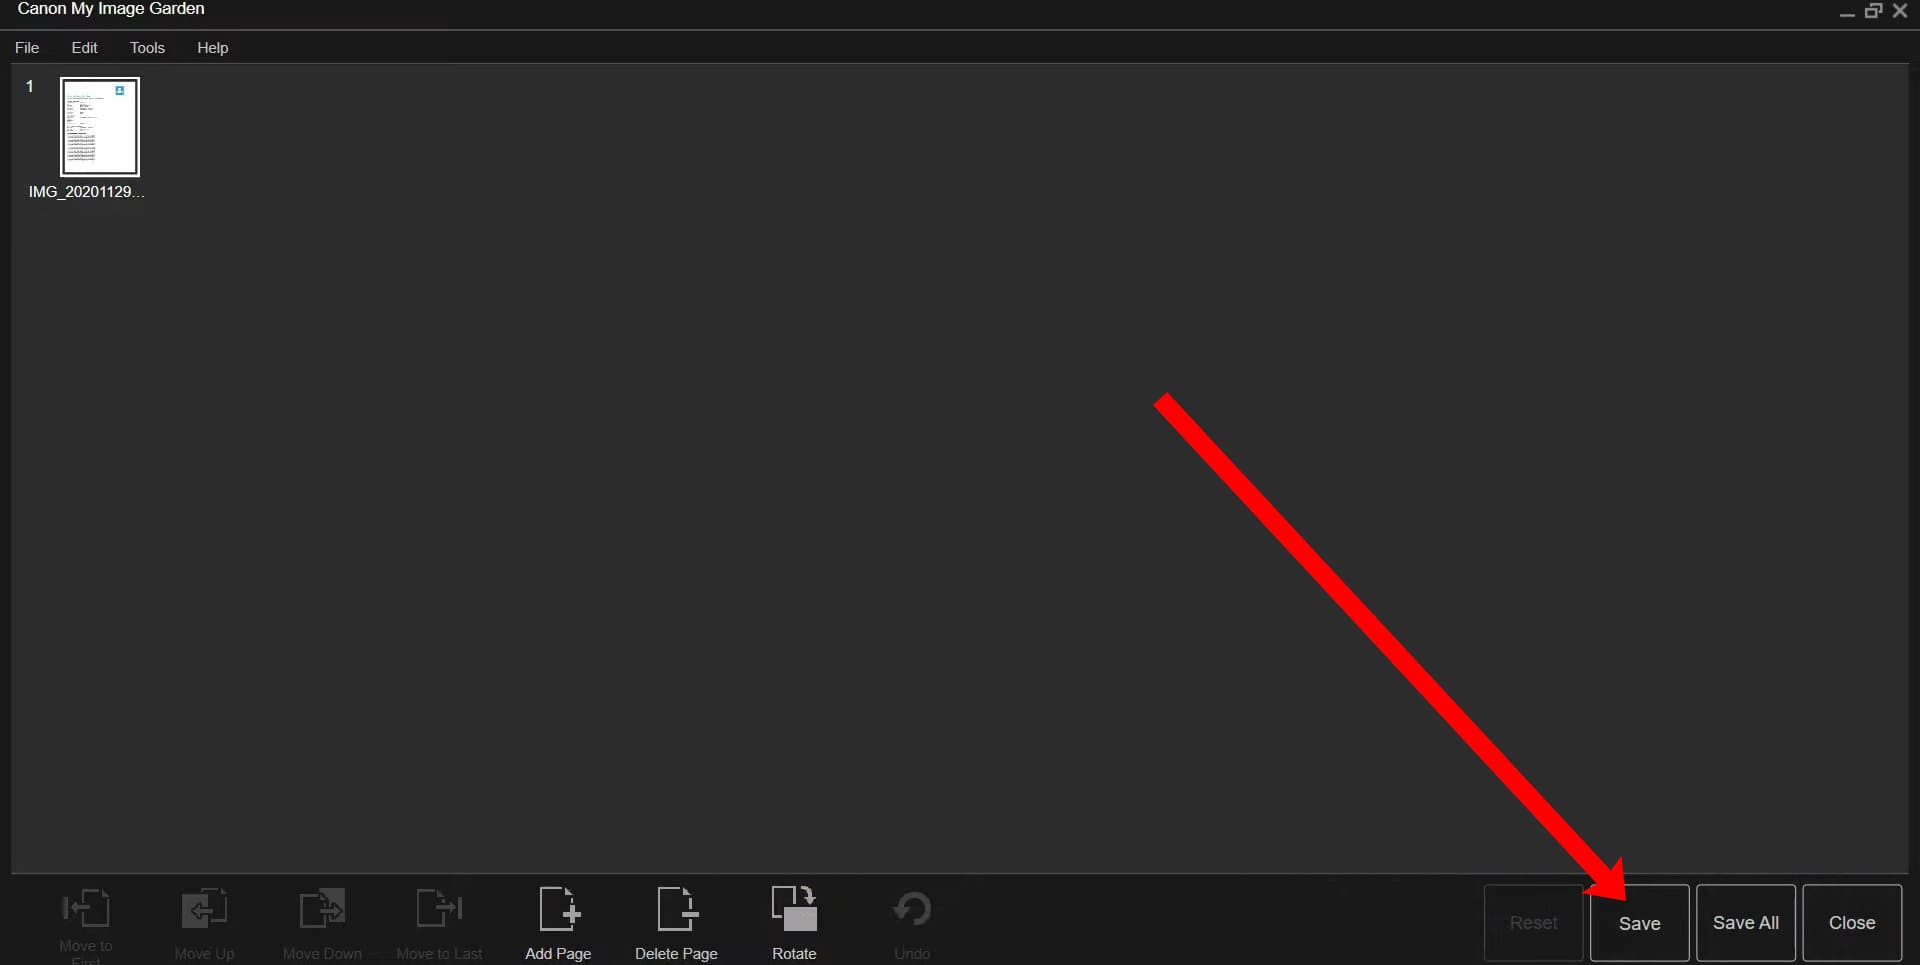
- You can rotate, edit, add another page, or save your scanned document as a PDF. Click on Save to save the file.
- To change the saving location, click Browse and select your preferred path. Next, you will need to enter your document’s name in the File Name field, choose PDF from the Data Format drop-down menu, and click Save.
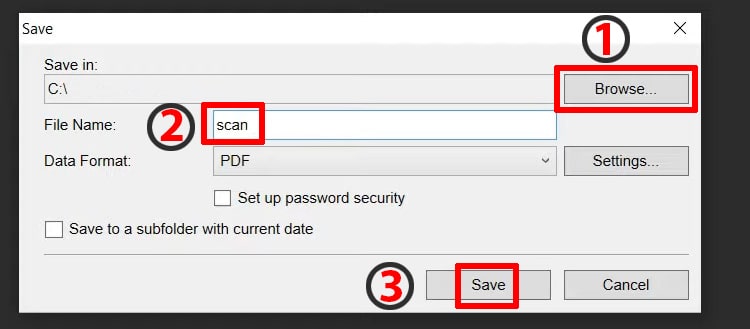
NOTE: All scanned documents are saved in the documents folder on your PC. Further, if you don’t want to use Image gardening to edit and save your scanned document manually, click on “Auto” in step 4. This will automatically scan and save your document as a PDF on your computer. You can change the Autosave path from the Setting section of your IJ utility tool.
How To Scan From a Canon Pixma mg2522 To Mac
Below are the steps to scan any document with a Canon Pixma mg2522 printer for Mac:
- Connect the Canon Pixma mg2522 printer to your Macbook using a data cable.
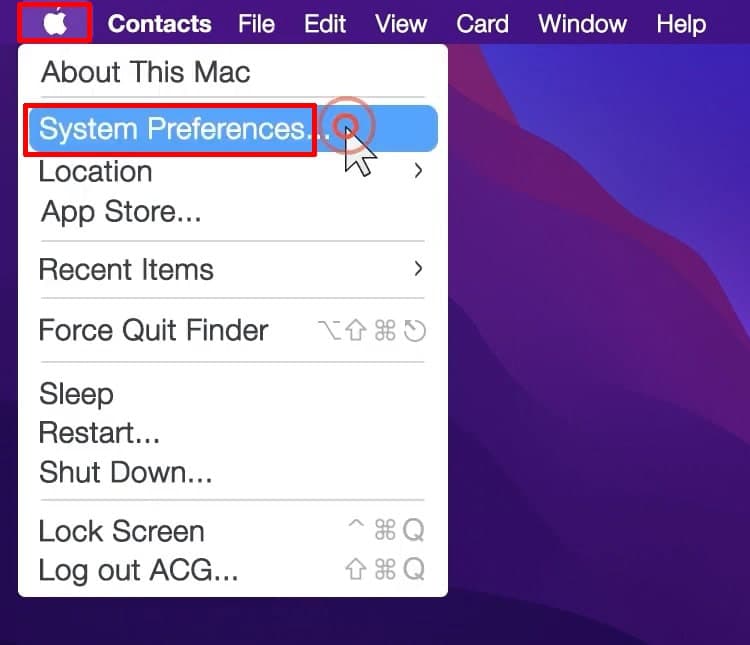
- Click on the Apple icon on your Mac computer, and select System Preferences.
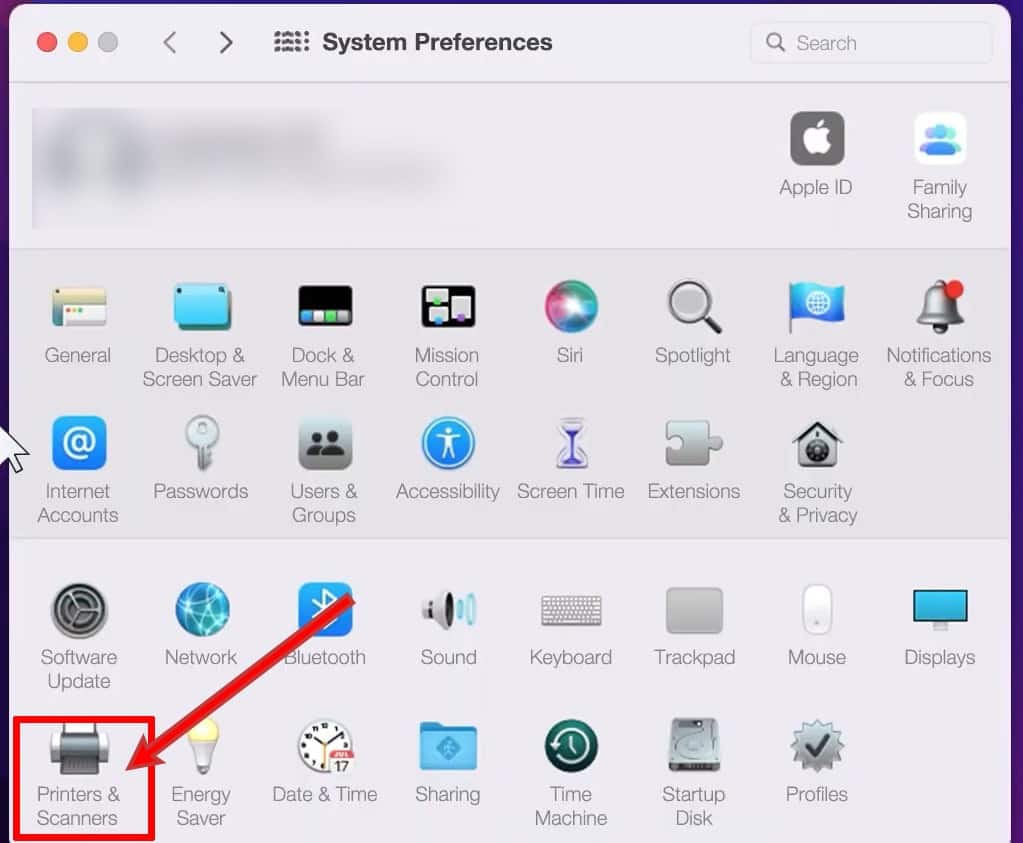
- Click Printers & Scanners.
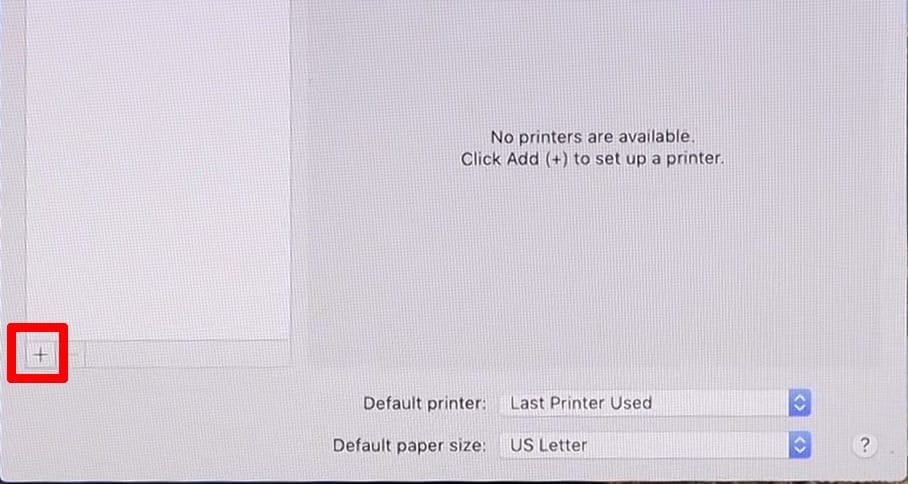
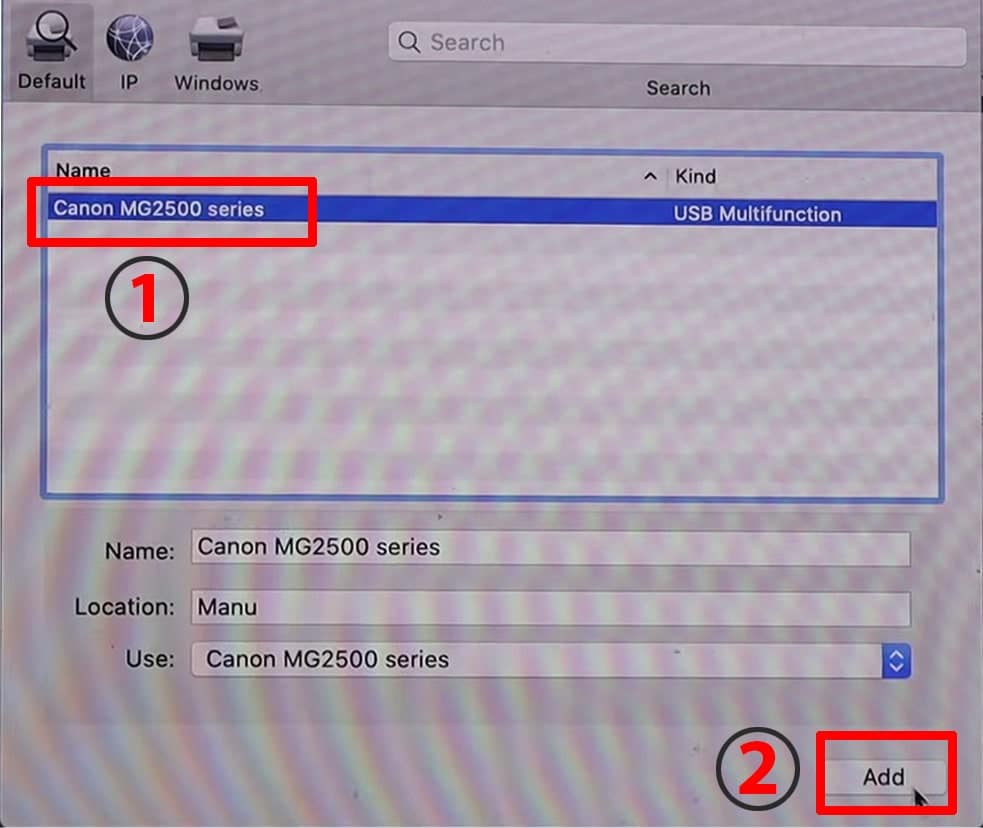
- If you have not yet added your printer, you must add a printer by clicking the + icon. Your printer will appear.
- Click on the printer name “Canon MG2500 Series”, then click Add. This will connect the printer to the Macbook.
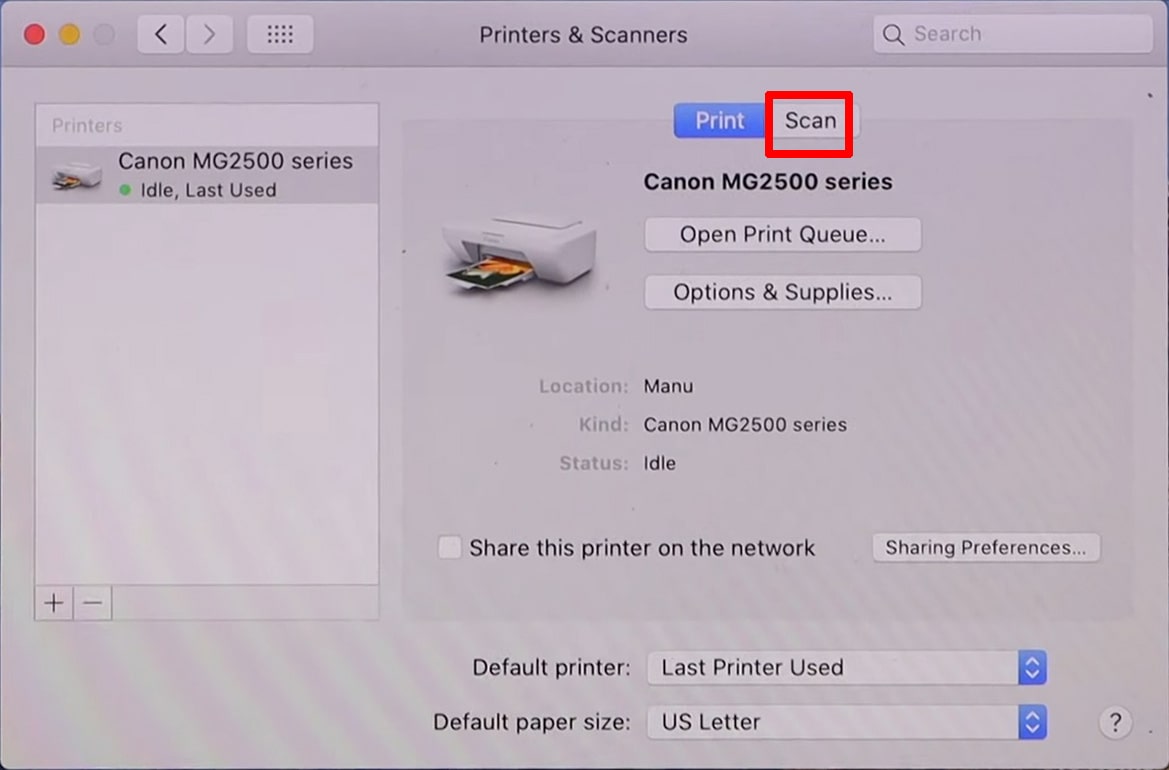
- Switch to the Scan tab under Printers & Scanners to scan your documents.
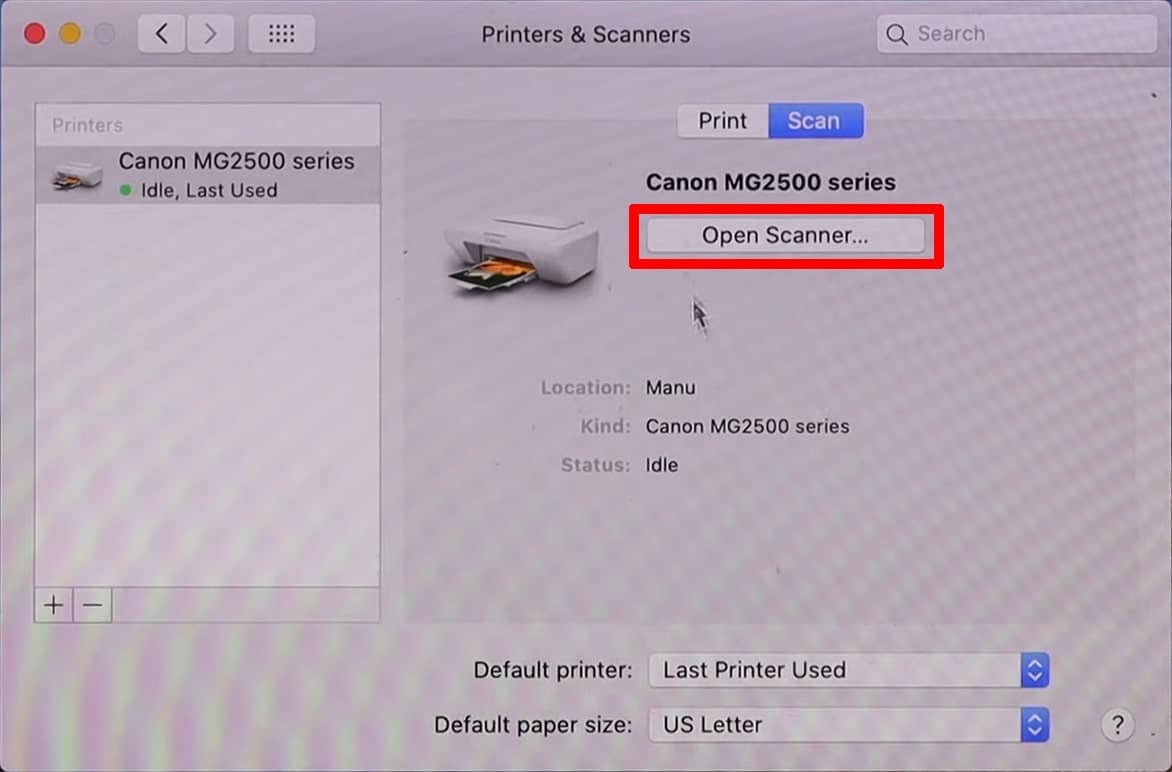
- Click on Opener Scanner… This will open a scanning Window.
- Then, lift the scanner lid on your printer, place your documents facedown on the platen glass, and close the lid.
- Select the type of scanned document size on your Macbook. You can change the location of the scanned document by clicking Desktop and selecting your path.
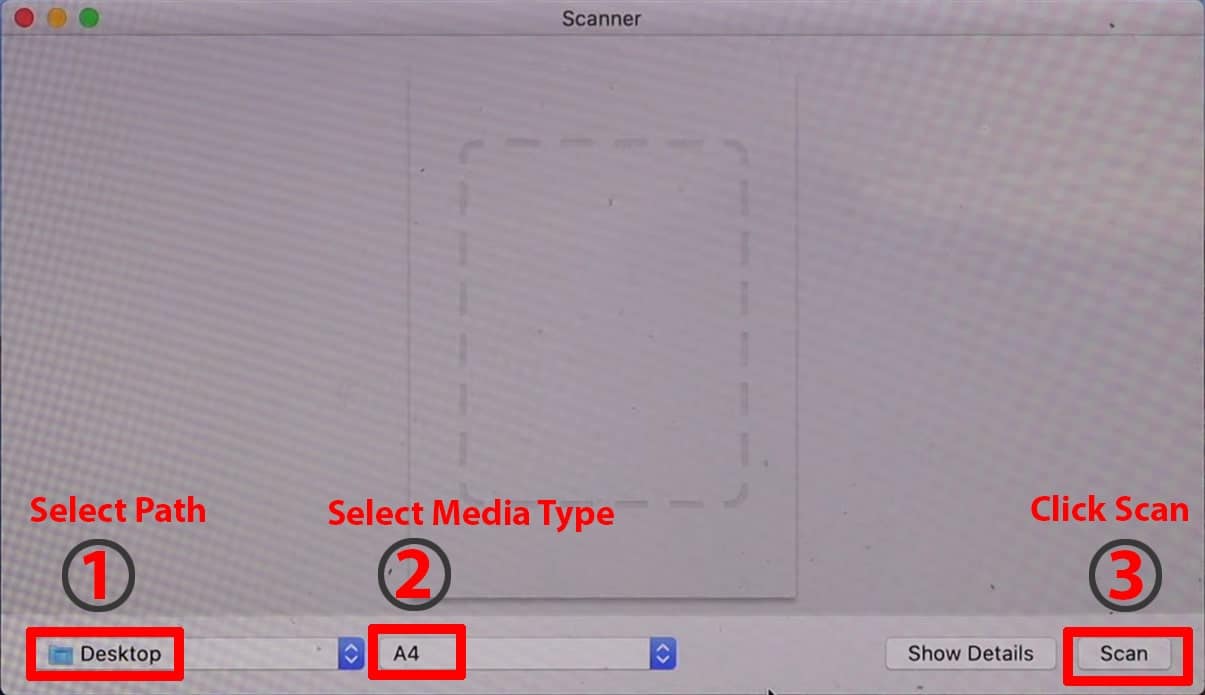
In addition, clicking on Show Details before the scan button will open additional options to control your scanning document’s settings, such as:
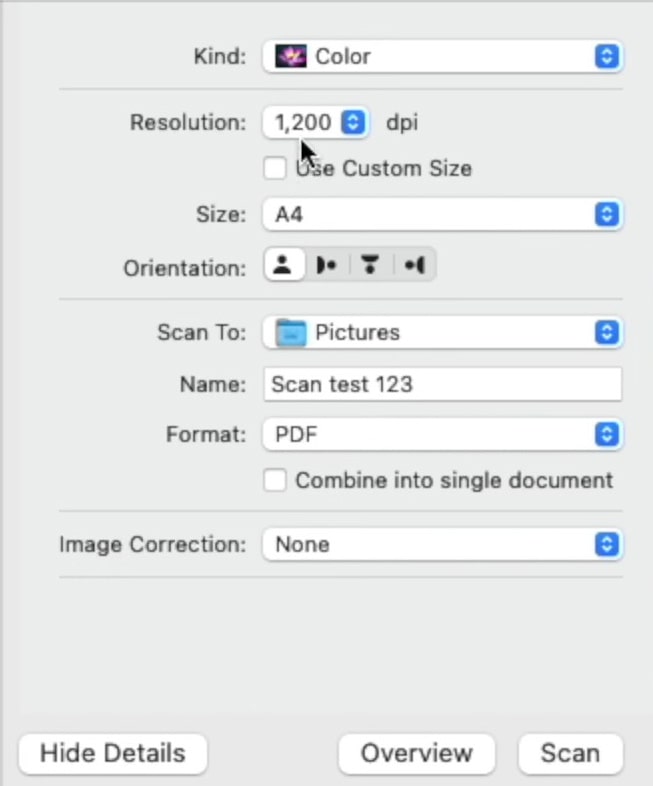
- Kind: specifies the output type, such as color or black-and-white.
- Resolution: It is the number of pixels in the image. To get the best quality, choose the highest scan resolution.
- Size: specify the page size
- Orientation: to flip documents
- Scan to: select where to save the scanned document.
- Name: Give the scanned document a name
- Format: Select a scan format, such as PDF, JPEG, or PNG
- After specifying all the details, click Scan to begin scanning the document.
- Click on the Scan button. This will start scanning your document. Additionally, a message will appear “Scanner is warming up,” and then ‘Scan’ on your Mac; wait for it to finish scanning.

- If it asks for any permission, click OK. Here you will see your newly scanned document.
Scan To Mac With Canon Pixma mg2522 Using Canon IJ Scanner
Canon’s IJ Scan Utility software is also compatible with Mac computers.
The following instructions describe how to scan with a Canon Pixma mg2522 printer to a Mac computer using IJ Scan Utility Software:
- First, ensure that the printer drivers are installed on your Mac computer, then connect the printer to your Mac.
- In the Mac Menu, click the Go tab, then select Applications.
- Expand the Canon Utilities and look for IJ Scan Utility, then click on Canon IJ Scan Utility Lite. Alternatively, you can also use the search function on your Mac to open Canon IJ Utility.
If you cannot find the IJ Utility software in the search results, you may need to reinstall your printer MP drivers to include the IJ Scan Utility software and other complete packages.
In addition, most new Pixma printers will work directly with Mac computers without special software, thanks to Airprint technology.
Unfortunately, the Canon Pixma mg2522 doesn’t support AirPrint, which is why you downloaded the full package drivers.
- Open your printer’s top cover and place your document face down on the scanner glass. Ensure that your document is aligned, then close the scanner’s lid.
- Using the IJ Scan Utility application, select Canon MG2500 Series from the drop-down menu under the product name. After that, click Settings.
- Switch to the Document Scan window. Here, you can control various useful settings, such as scan resolution, destination path, and so on.
- The first step is to decide where to save your scanned documents on your Mac. Next, click Pictures under Save In and select Add. Finally, click the + icon, and choose the destination folder by clicking OK.
- Next, Choose the software you’d like to use to open your scanned document. To do so, scroll down to Application Settings and click Add next to Open With an Application to add it.
- Click + and choose Safari from the application list, then select Open and click OK.
- Once you’ve completed the settings, click OK to return to the IJ scan utility’s main screen.
- After clicking on the document, the Canon Pixma mg2522 printer will scan your placed document to your Mac computer.
Wrapping Up!
Hopefully, you learned how to scan with the Canon Pixma mg2522 printer to your Windows or Mac computer. In this guide, I have made it easy to quickly and efficiently scan any document with Canon Pixma MG2522.
The default scanner of your operating system or Canon IJ scan Utility will both work to scan with a canon Pixma mg2522 printer.
However, since Canon provides a separate tool for scanning, it makes sense to use it for bulk scanning.
Therefore, IJ Utility Scanner makes editing, rotating, and organizing scanned documents a breeze.
