If your HP Printer is not printing color pages, it means your window has been updated, and some settings have been changed that have disabled the color printing functionality of your HP printer. It is also possible that your color ink cartridges have run out.
There may be multiple causes for your HP Printer not printing in color, but one of the most common causes is the printer driver.
I’m Jabran, and today, I will explain how to fix HP Printer Not Printing Color Pages and list the possible reasons that caused the issue.
How To Fix HP Printer Not Printing In Color?
If the color printing option is disabled on your HP printer. Something needs to be fixed with the printer driver.
- In order to fix the HP printer not printing in color, go to the control panel > click View Devices and Printers > right-click on the faulty printer > select Remove Device.
- Click on Add a device at the top bar and follow the on-screen instructions.
- Upon successful installation, your printer will be able to print in color again.
- Check out the below step-by-step instructions with pictures for further information.
Table of Contents
What causes the HP printer not to print in color?
If your HP printer doesn’t print in color, there are six possible reasons why this might be happening:
- Faulty Drivers
- The color printing feature is disabled
- The printer is not set as the default
- Color Cartridges has run out of ink
- Problem with Printhead
- The printer doesn’t support Color Printing
How To Make an HP Printer To Print in Color?
There are different ways to fix HP printers that don’t print color pages.
Rather than trying any other method, I recommend that you follow the first method, in which I have outlined how to fix the printer driver, which is the most common reason for HP printers not printing in color.
Before going to the solution, you must set your HP printer as the default.
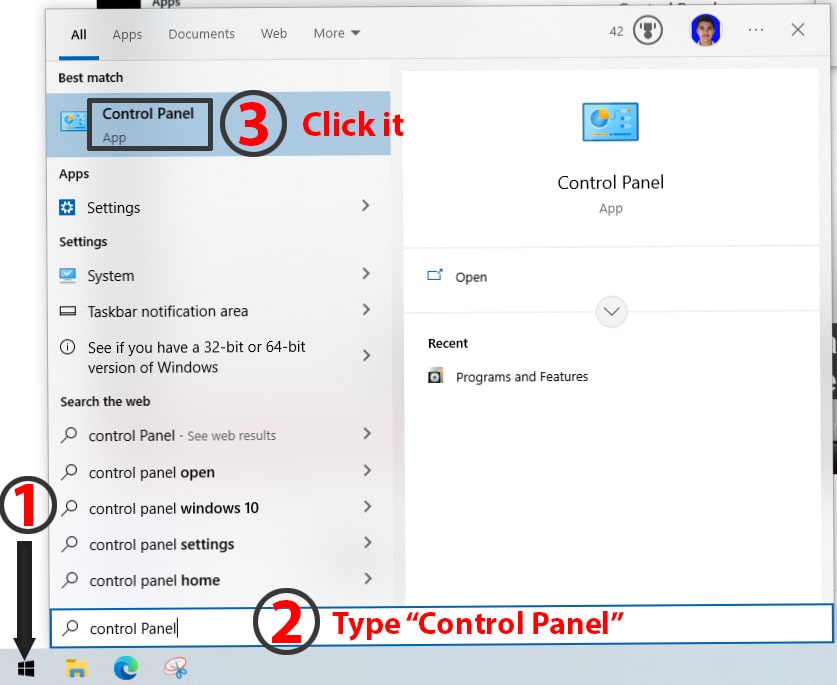
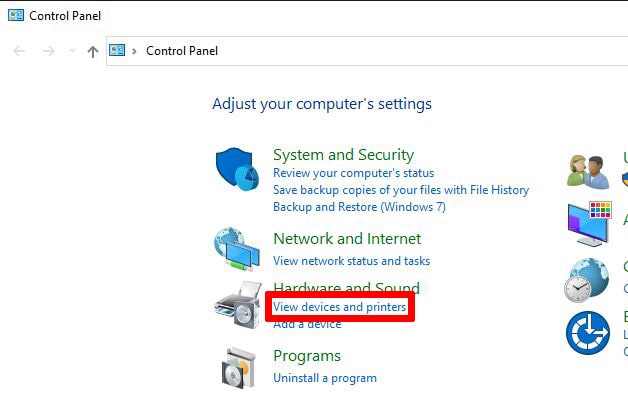
Go to the Windows start menu > type “Control Panel” and press enter > Under Hardware and Sound, click View Devices and Printers.
It will show you a list of printers, right click on the faulty printer and select “Set as Default,” now, test your printer to see if it works. If not, follow the below method to fix the issue.
Fix #1 Remove And Add your HP Printer – Fixing Color Issue
Follow the below steps to fix the HP Printer Not printing color.
- Click on the Start Menu button in your window, type “Printer” and hit enter to open the printer & scanner settings.
If you are using an older version of Windows, go to the control panel > Devices and Printers. - Click on the faulty printer, select “Remove Device,” then click “Yes.”
- Now click on “Add a Printer or Scanner.”
- Once your printer appears in the list, select it and click “Add Device.”
- After clicking Add Device, the new drivers will begin to install. It may take a few minutes to complete the process. Upon completion, it will display “Ready.”
- Finally, test the printer by printing a color page, and the issue of the HP Printer Not Printing Color Pages will be resolved.
The next step is to test if the colors are printing properly.
- Open MS word, load your colorful document, and press Ctrl+P (or click on File > Print) to open the print dialogue box.
- Check the selected printer, it would say connecting, and after a few seconds, the status will change to ready.
- Click on printer properties.
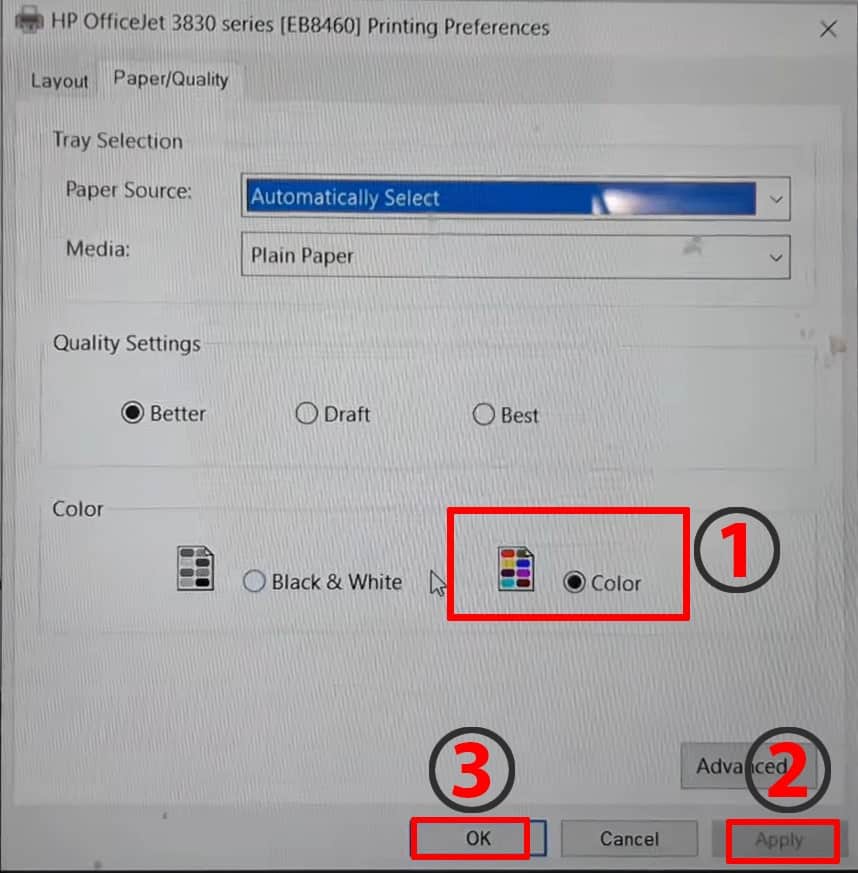
- Switch to the Paper/Quality tab. Choose “Color” and click “OK” to save changes. Your printer will now print in color.
Fix #2 Enable Color Printing From Device Settings
Some HP printers allow you to enable and disable color printing. If such settings are messed up, it could lead to no color printing.
Below are the steps to enable color printing on HP Printers:
- Click on the Windows start menu button and type “Control Panel,” then click it.
- Under Hardware and Sound, select “View devices and printers.”
- Right-click on your printer, then choose “Printer Properties.” This will open a new window.
- Navigate to “Device Settings,” scroll down, and change “Device Type” to color. If you don’t see the device type option, follow the next step.
- In the device Settings, expand the “Installable Options,” go to automatic configuration and change the “Off” to “Update Now.” Then click Apply and OK to save the settings.
Good to go; now check your printer to see if the problem has been resolved. If not, follow the next method.
Fix #3 Uncheck Grayscale Printing
- Click on the window start menu, type “Control Panel,” and press enter.
- Now under “Hardware and Sound,” click on “View Devices and Printers.” This will show you a list of connected printers.
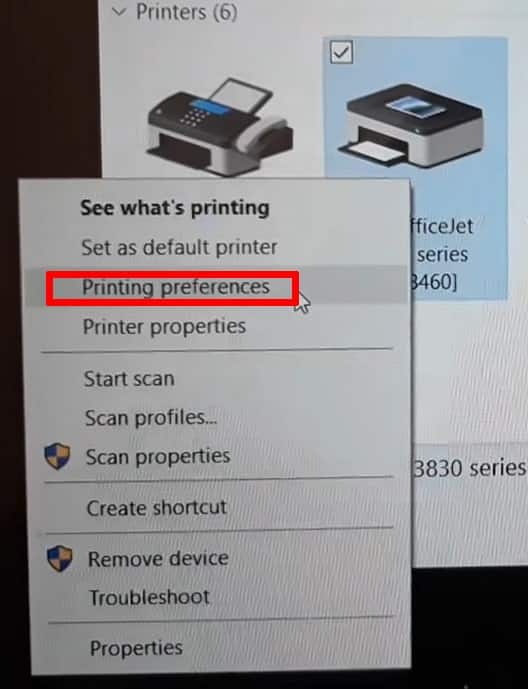
- Identify your faulty printer, right-click it, and select “Printing Preferences.” This will open a new window.
- Switch to Paper/Quality. It has two options: “Black & White” and “Color.” Choose “Color” and click “OK.” Hopefully, your printer will now work.
If the Paper/Quality tab does not have the option to switch from black and white to color, try method one first (uninstall and reinstall your printer), then try this method.
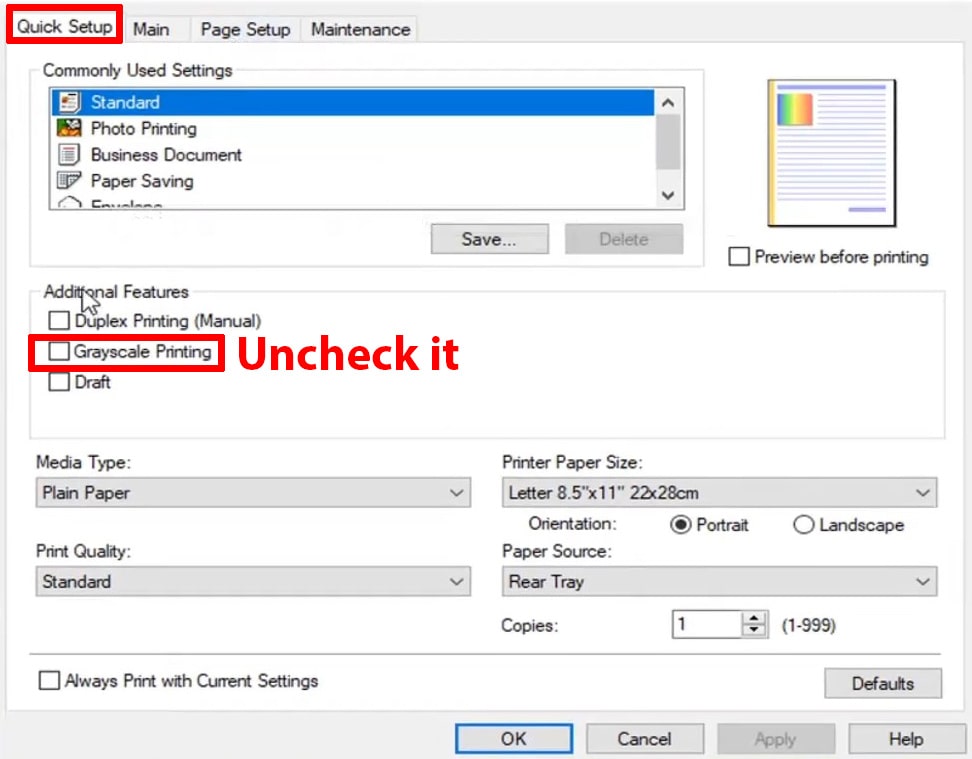
Note: If your printer doesn’t have a Paper/Quality Tab in your Printing Preferences, you might have a different option like the one below.
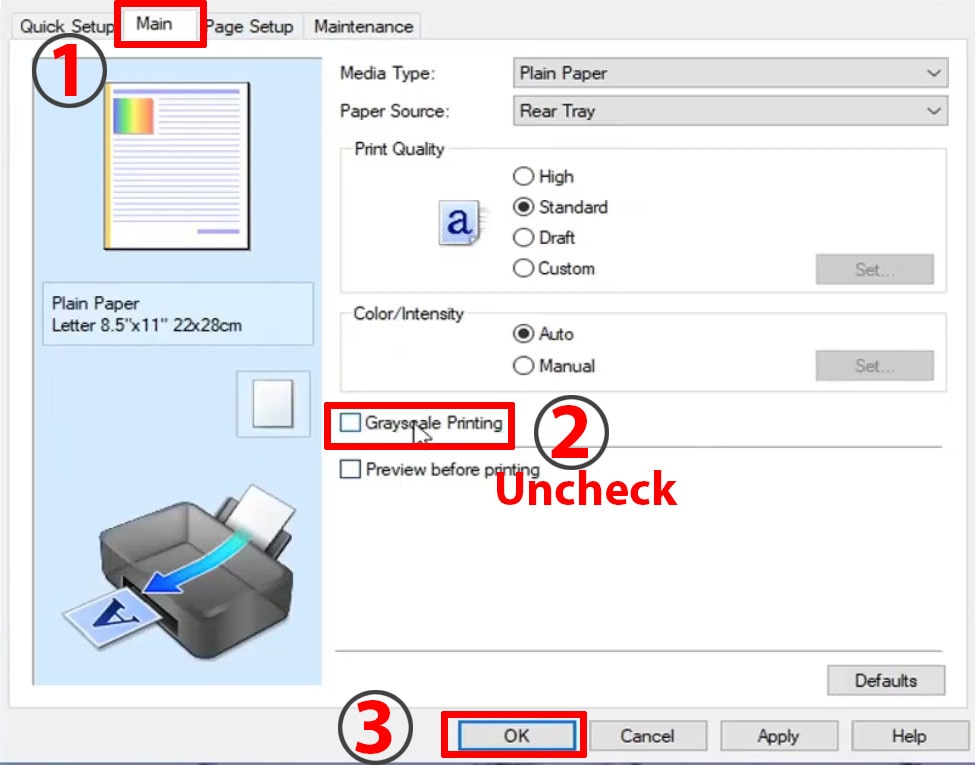
- Under additional features, uncheck grayscale printing.
- Also, uncheck grayscale printing on the Main tab.
Fix #4 Change Driver Type To Microsoft IPP Class Driver
- In the start menu, search for “Printers & Scanners” and press enter. A list of connected devices will appear.
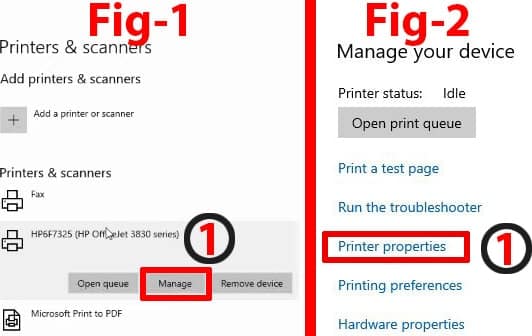
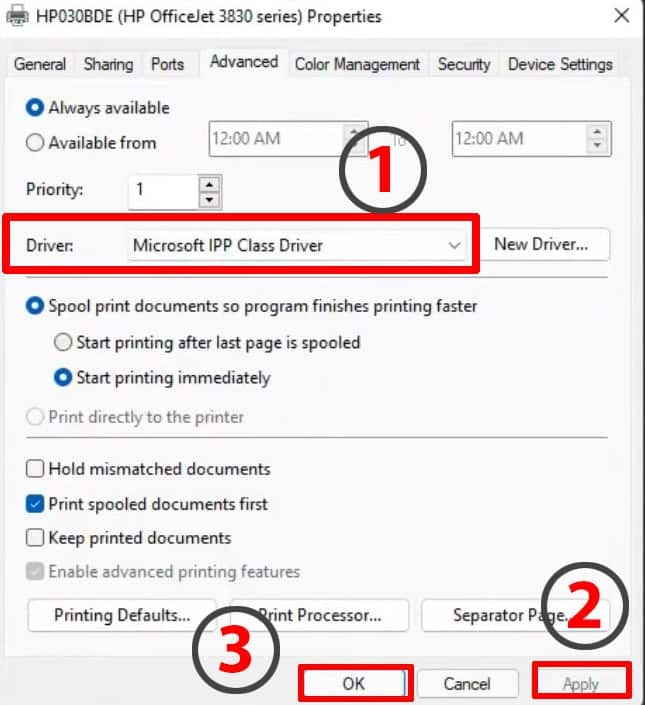
- Click on the faulty printer, select “Printer Properties,” and switch to the “Advanced” Tab (Window 11). If you can’t find the “Printer Properties,” then click on “Manage,” then click on “Printer Properties,” and then switch to the “Advanced” tab. (Window 10).
- Now Under Driver, change the Driver from your printer drivers to “Microsoft IPP Class Drivers.” After that, click “Apply” and then “OK.”
- Now Print a color test page, and your printer should usually start working.
It’s also essential to clean your HP printer’s printhead. A dirty printhead could cause your HP printer to stop printing color pages. In most cases, it’s an issue with your printer driver.
Conclusion:
Hopefully, you have resolved the issue with your HP printer not printing color. HP printer drivers likely cause the problem, so you will need to uninstall and reinstall your printer drivers to resolve the issue.
However, you can also try other methods to see what works for you. And let me know which solution fixed the issue for you.


